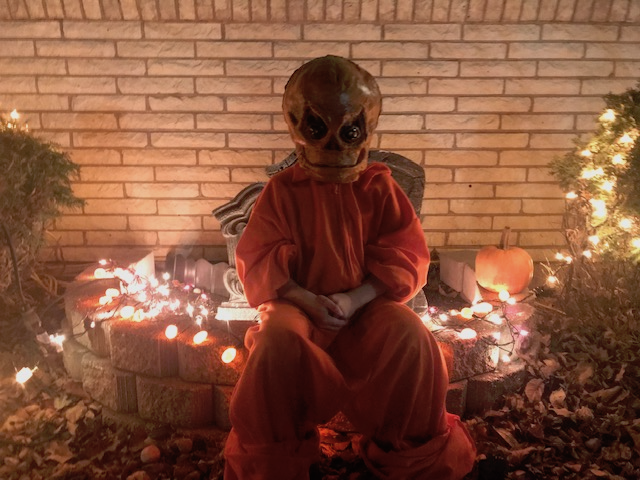
How to Make a Latex Trick r' Treat Sam Mask from Scratch
Ratings powered by mojirater
This was my first attempt making a latex mask for my Halloween costume. It isn't perfect, but it was a fun project and I think it could be the beginning of a new hobby. Basically, there are 5 steps:
- 1. Sculpt the head with Monster Clay Premium Grade Modeling Clay (5lb)
, oil-based clay (or water-based clay)
- 2. Make a mold of the head with Plaster of Paris or Hydrocal
- 3. Cast the latex mask using The Monster Makers RD-407 Mask Making Latex (1 Gallon)
- 4. Paint and seal the mask
- 5. Scare the hell of out the neighbor kids.
So let's break down the steps into further detail.
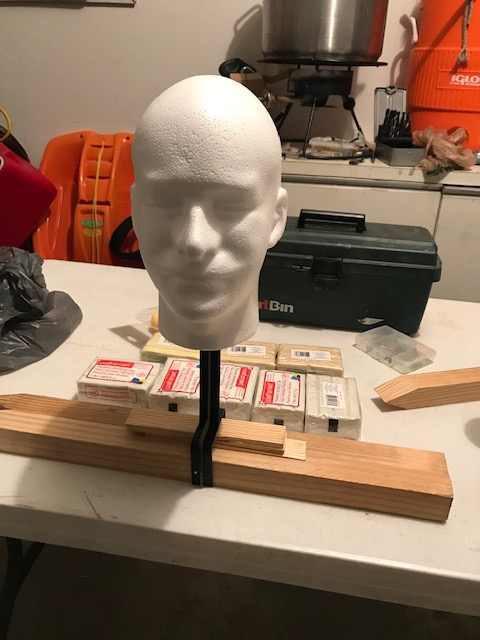
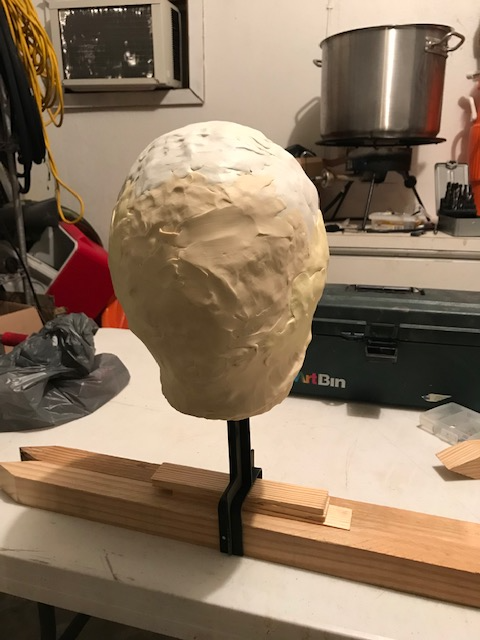
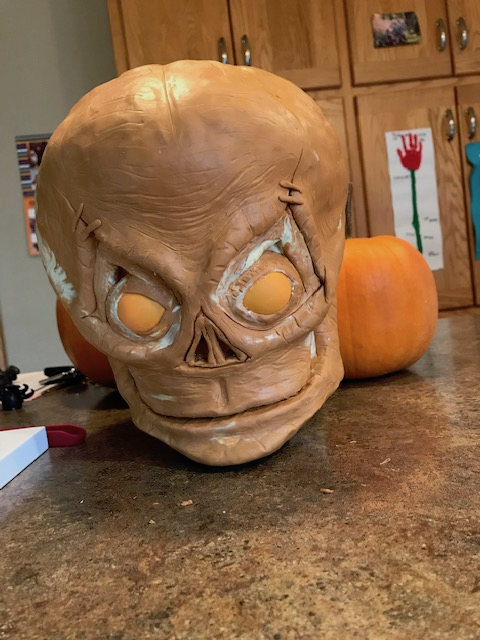
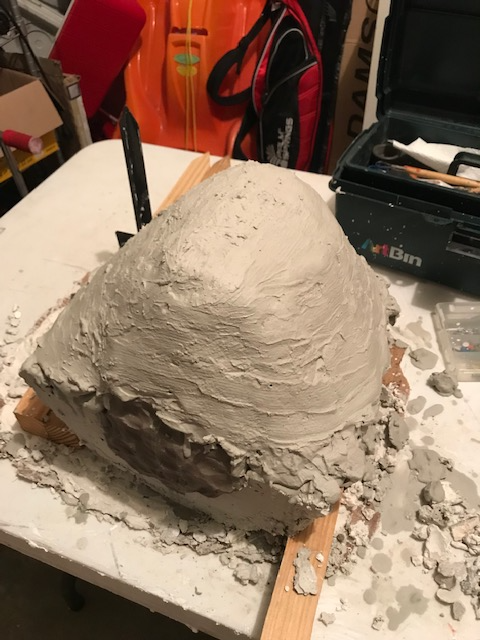
The first step is to sculpt the head. I used Plastalina Oil Clay that I bought from Michael's. I couldn't find enough of the same color so I made due with a few different colors. The clay was a bit too hard so I suggest adding Mineral Oil to it to soften it up. If you are willing to spend a bit more money you could get Monster Clay Premium Grade Modeling Clay (5lb). It is very popular. You can use regular water-based clay as well, but it can dry out and you might not be able to reuse it. Oil Clay can be re-used because it doesn't dry out. Also to save some time, you can use things around the house for certain features that might be hard to sculpt like teeth or eyeballs. I used a ping pong ball cut in half for the eyes.
Once you have a sculpt of the head, you need to create a mold. This is the step where you layer Plaster of Paris or Hydrocal 30 on the mask. This will be the shell that you pour latex into. I did a full mold. This means that you create a front and back mold so the mask will cover your whole head. To prepare for this step you need to create a clay wall around the head. Next, cut out some key locks or a gutter key in the clay wall and then put cooking spray or vaseline on the mask and clay wall to prevent the plaster from sticking. I did the back first.
Next, you actually make the plaster. Follow the instructions on the package. Most likely it will tell you to mix the plaster into cold water by slowly sifting or spooning it into the water. The ratio will be about 2 parts plaster to 1 part water. I made batches with 2 quarts of water which fit nicely in an old ice cream bucket. Let the plaster sink in before stirring. Eventually the plaster will stop absorbing the water and will look like a dry river bed. At that time you are ready to slowly break up the clumps with your hand or by stirring. Avoid adding air to the mixture. Also, I attempted to make my own Hydrocal by adding Portland Cement to the Plaster of Paris. Not sure if I will try that again. The mixture was about 90% plaster and 10% cement or around 16 oz plaster with an added 1.7 oz of cement. I didn't add silica.
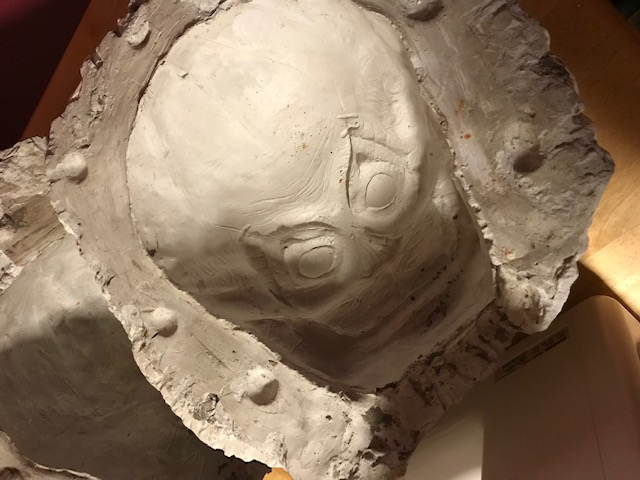
Once, the plaster has the consistency of pancake mix brush it on the back of the mask. The plaster will slowly get thicker. When it starts getting too hard to brush on just use your hands to pile it on. Smooth with your hand. If you want, you can add burlap in between layers. Just dip the burlap in the plaster and then smooth it onto the mask. Start with the bottom and sides. This will make it very strong. Let the back dry before removing the clay wall and flipping it over.
Once the back is dry, it is time to do the front. There is one extra step is very helpful. You create pry tabs so when it is time crack the mold in half you have some soft clay where you can put the screwdrivers. These are just pieces of clay attached to the edges of the just hardened plaster. Add 5 of these spaced evenly around the mask. Then repeat the same steps as above for the top. Coat the vaseline to prevent sticking, brush on the thinner plaster in the detailed areas, and then layer on the thicker plater with your hands. Once the top has dried, you gently hammer screwdrivers into the pry points until there is a slight crack. Leave that screwdriver in and move onto the next once. Once there is a crack all of the way around you pry it open. Good luck. Have someone with you to help hold the mold and make sure it doesn't fall.
Once the halves are separated you need to remove the clay from the mold. Use your hands, wooden tools, and even a toothbrush. Avoid anything metal because you don't want to damage the mold. Don't get it wet. You want the mold to be dry so it can absorb the moisture of the latex.
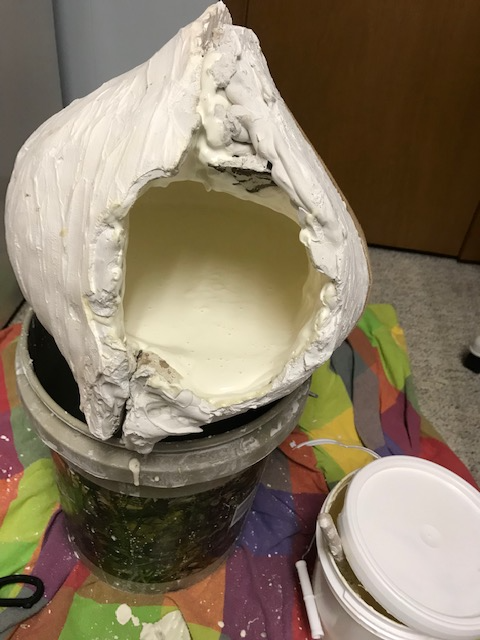
Next, put the halves together and strap them together with a belt or bungy cords. Check for gaps between the halves. If you see light shining through put some clay there to seal it up. You don't want latex to leak. Now you are ready to pour the latex in. Ideally, you want to fill the whole thing up. This will take around 3 gallons. I only had 1 gallon so I had to roto-cast which means I had to rotate the mold to get the latex on all sides. If you can fill the mold, then you just wait 45 minutes and dump the latex back into the container. I wasn't sure how long to wait with my method so I just rotated it every 5 minutes for an hour and a half. You want the latex to be around 1/8" all around. Then dump the latex back into the container. Let the latex drip out for 10 minutes or so to get out the extra. Now blow a fan into the mold and wait for a few hours or overnight with no fan.
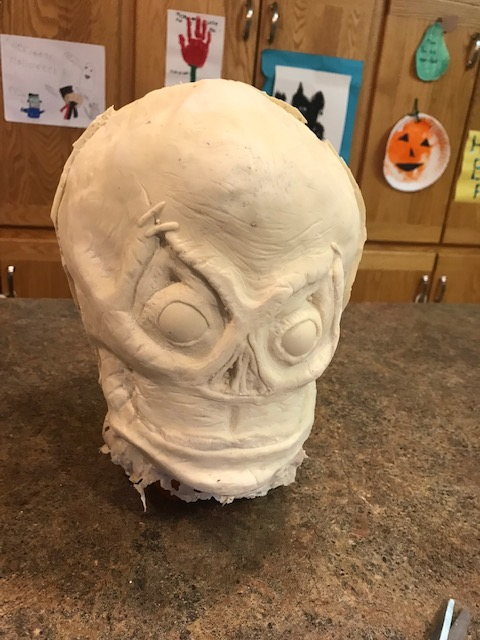
Once the latex isn't wet and looks more like a skin tone, you can sprinkle some baby or talcom powder into it and use a hair dryer to spread it around. This prevents the mask from sticking to itself. Remove the mask by prying the latex away from the edges of the neck first. Once the mask is out of the mold, turn the mask inside out and cut some eye, ear, nose, and mouth holes with a scissors. Cut a slit along the back until you can slip it on over your head. If you have a single hole punch, make a hole at the end of the slit to prevent it from tearing more. Do any other trimming around the bottom and the seam of the mask. If you have a dremel you can you use that.
Now you are ready to paint. I used a mixture of oil paint, rubber cement and mineral spirits/Naptha. The mixure is 50% naptha/spirits, 35% rubber cement and 15% paint. This is pretty toxic so be sure to use a respirator, wear gloves, and do it in a well ventilated area. I painted on an orange base-coat. You can also try acrylic paint and liquid latex using a 1/1 ratio or purchase some The Monster Makers Latex Mask Paint 9 Color Kit (4oz Bottles). Once dry, I painted on another darker coat and then wiped it off with a paper towel with some alcohol. I wanted the dark color to just remain in the low spots and cracks. Then I did the same for the eyes and nose with their appropriate colors. FYI, if you have an airbrush it will turn out better. I think I am going to purchase one for the next time. Once it is dry, you can seal it up. I used a 50/50 mix of Liquitex Matte Finish and Liquitex Gloss Medium for the mask. I used just the gloss for the eyes.
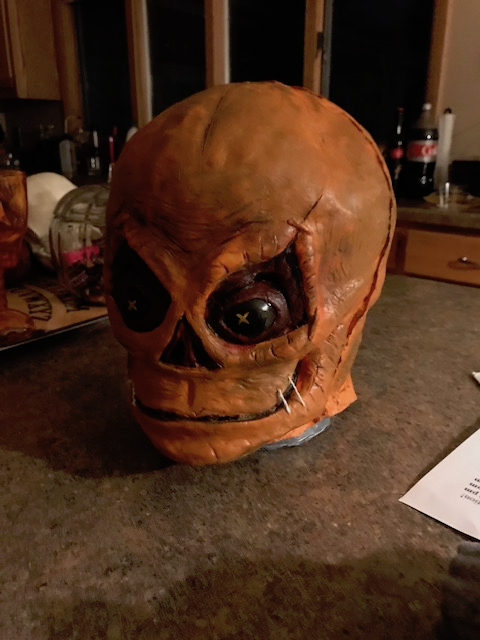
There you have it. A Sam mask from scratch. Let me know what you think.

Here are some of the awesome resources that helped me get started:
How-To Demos from Monster Makers


